To Do List for 2/19

Closeup image of notepad with pen.

Learning objectives:

  • I know how to export my Slow Shutter Speed Photo for the Photo Challenge due today.
  • I can help a classmate turn in their photo for Slow Shutter Speed.
  • I understand what aperture is and how it can control how much of an image is in focus.

Step by Step:

  1. Check out Today’s Warm Up: Aperture Explained
  2. If you were able to turn in your slow shutter speed photo. Help someone who doesn’t know how to do that.
  3. Read over the requirements for the next photo challenge, Indoor/Outdoor
  4. Sketch out an idea for Indoor & Outdoor. And take a photo to put into your visual journal.

Today’s Warm Up: Aperture Explained

We’ll watch this video in class. Then afterwards. answer these questions into your visual journal. Copy the link to your video and put it into your visual journal.

What part of your eye is the aperture like?

What does the f stand for?

What is depth of field?

Photo Challenge #2: Indoor/Outdoor

For this week’s photo challenge, you will take one INDOOR PORTRAIT and one OUTDOOR PORTRAIT. of the same person One taken inside in one of our studio spaces, and one taken outdoors, either outside of school or on school grounds.

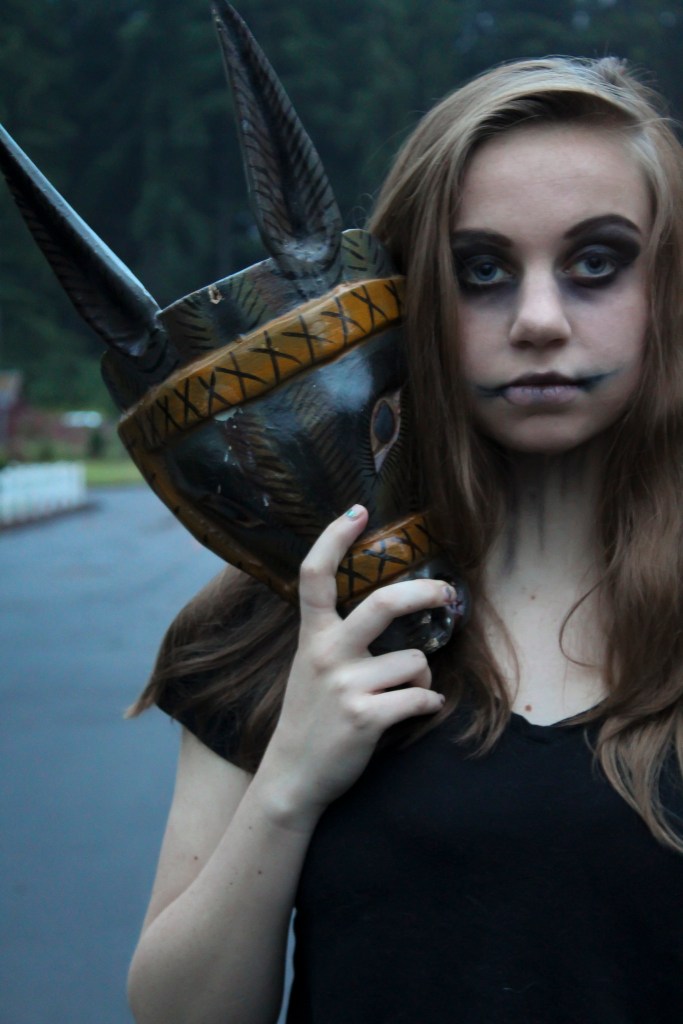
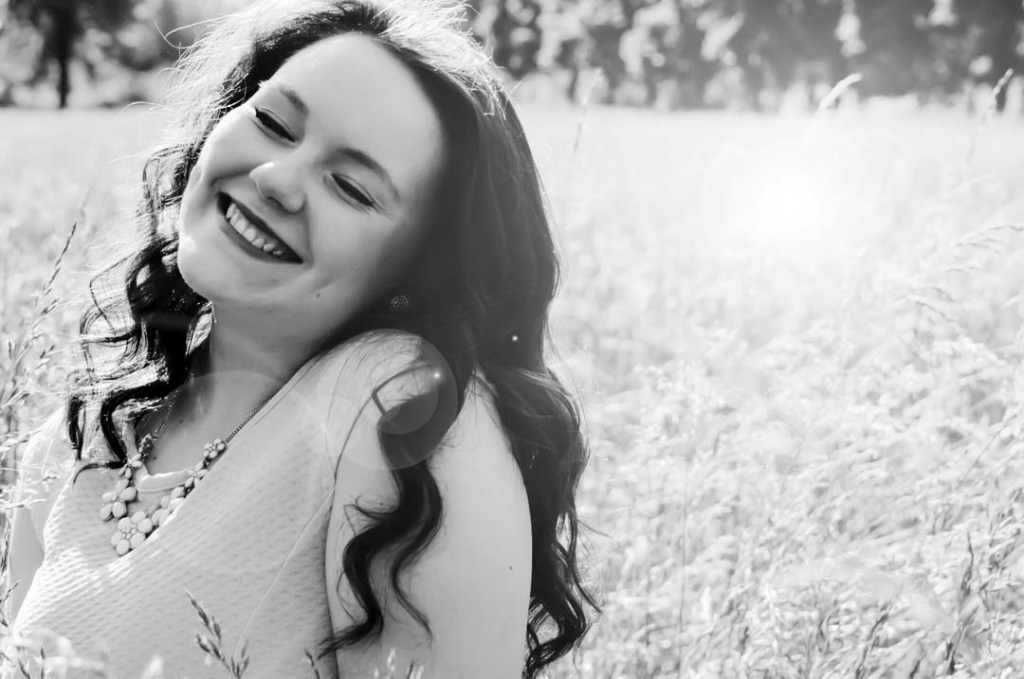
The purpose of any portrait isn’t just taking a flattering image of someone, but trying to get across the the viewer the essence of that person. Notice all of these examples show people being truly themselves. We can tell what their interests are based on where they are placed. Lying down on a patch of grass and looking up at the sky, arms placed just so. We get the essence of a person there. Standing in the batting cages, the light hitting her harshly, but she takes that light head on, with no apologies, there is personality there as well.

WE WANT TO GET PASSED THE SELFIE LOOK AND TRULY GET TO KNOW ANOTHER PERSON.

Find out two bits of information about this person, and capture two sides of their personality in two different photos.

One example could bet, Softball, see above. Or shyness, see above with the hand over the mouth. Maybe the person feels withdrawn, maybe they are a cocky confident personality, maybe they are goofy, funny. Put this in the shot!

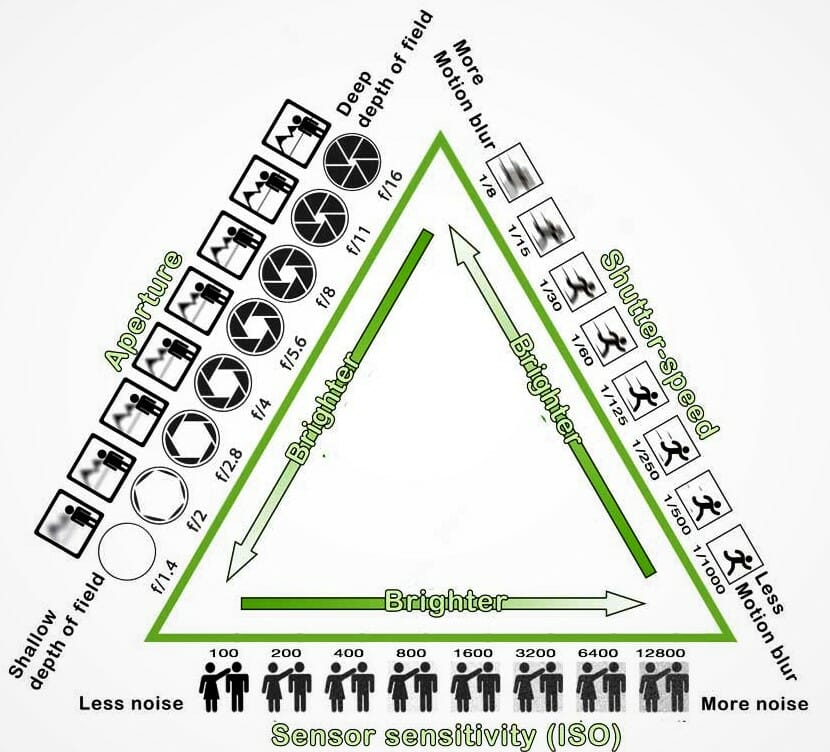
To do these photos, we will be using the AV mode of the camera. This time we will be using APERTURE to control DEPTH OF FIELD

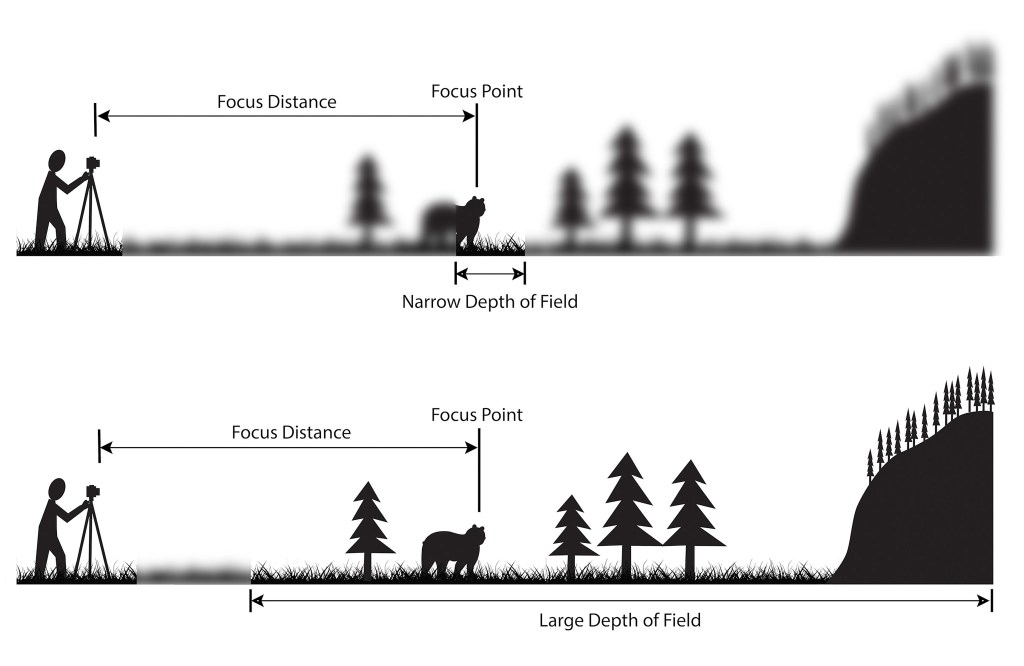
Depth of field is the amount of focus in an image.

In Narrow Depth of Field, we only see the Wolf in focus. Whereas in Large Depth of field, we see everything.

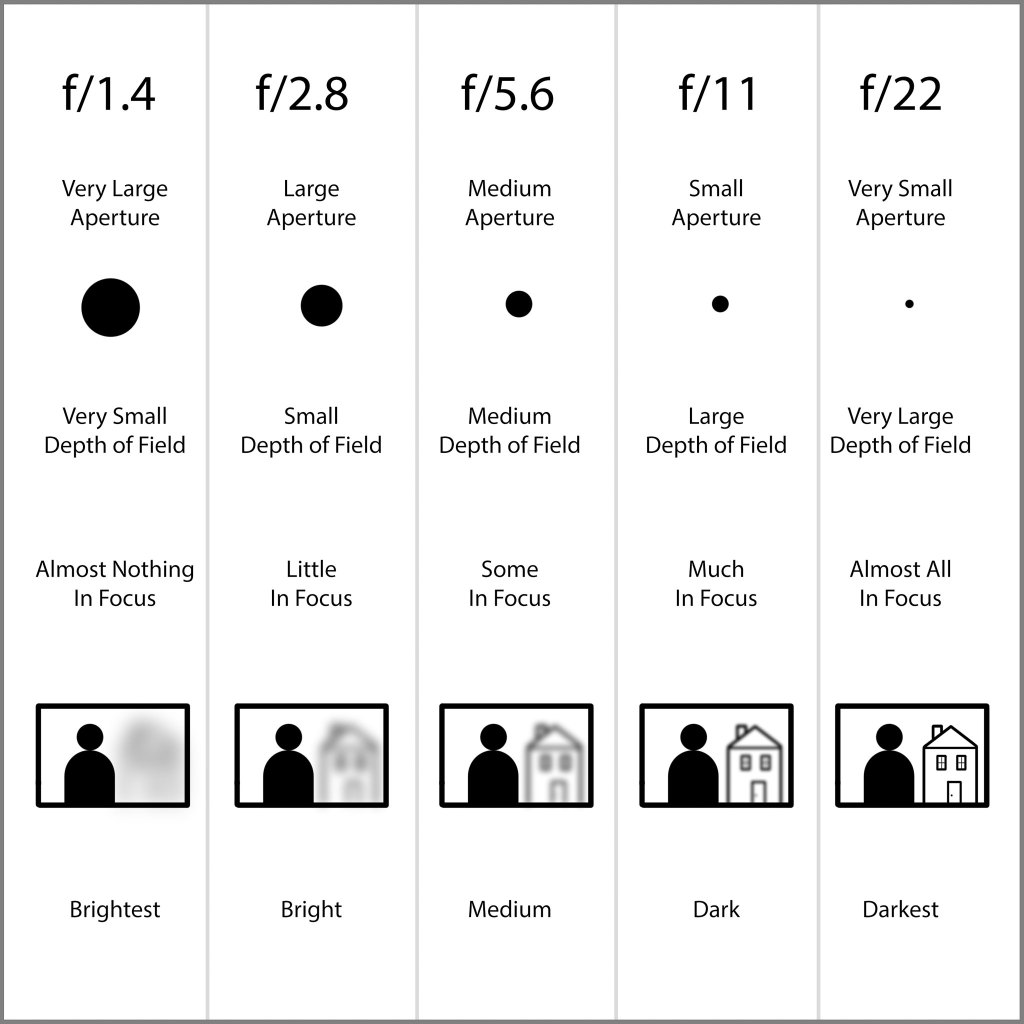
Depth of field is controlled by Aperture. In the AV mode of the camera. The Aperture is the size of the opening in the lens that lets light into the camera.

Note that the smaller the aperture number, f/1.4, the larger the opening, the larger the opening the smaller the opening. It works backwards.

So if you want the background blurred out, use an aperture of f/1.4 For everything in focus, you want to use a higher aperture, f/11, or f/22. Note that aperture effects shutter speed, and with a aperture setting of f/22, the shutter speed will be several seconds, so you need a tripod when shooting in this mode.

USE A/V mode to control aperture. Most portraits focus on the person, but a middle setting would allow the background to be visible as well.

What I’m grading you on:

  • Clear, in focus images.
  • A background that informs us of your person’s personality.
  • Appropriate Depth of field to the subject.
  • Strong sense of who this person is.

One indoor portrait and one outdoor portrait are due on Wednesday, 2/26

To Do List for 2/18

Closeup image of notepad with pen.

Learning objectives:

  • I know how to export my Slow Shutter Speed Photo for the Photo Challenge due today.

Step by Step:

  1. Check out Today’s Warm Up: Exporting your Photos from Adobe Lightroom
  2. Edit the best slow shutter speed image you made last week.
  3. Export your photo using the tricks you learned in today’s warm up.
  4. Turn in the Exported LastName_Slowshutter.jpg image you exported in Lightroom today
  5. Turn into Google Classroom.

To Do List for 2/14

Closeup image of notepad with pen.

Learning objectives:

  • I know a few editing techniques in Adobe Lightroom.
  • I can make and edit my first slow shutter speed photos.

Step by Step:

  1. Check out Today’s Warm Up: Editing Tips in Lightroom.
  2. Make your first slow shutter speed image from one of the sketches you made this week.
  3. Take the images into Lightroom, then edit them using the techniques you learned about earlier today.

Today’s Warm Up: Editing Tips in Lightroom.

A photo I took at the Multicultural Assembly a few weeks back.

Read the article on this link: https://www.digitalphotomentor.com/7-simple-lightroom-tips-improve-photos/, fire up your Visual Journal, and answer these brief questions.

What are the basic editing techniques discussed in these images?

Which technique will be most useful to you for your fun with slow shutter photo?

Which technique is shown on the lower right hand corner of the image I posted that is mentioned in the article?

Post these answers to your visual journal. Save the most useful screenshot from the website to your visual journal.

To Do List for 2/12

Closeup image of notepad with pen.

Learning objectives:

  • I can correctly identify how to change Aperture, Shutter Speed and ISO on Canon DSLR cameras.
  • I understand the requirements of the new photo challenge, Fun with Slow Shutter Speed
  • I can sketch out an idea for slow shutter speed.

Step by Step:

  1. Check out Today’s Warm Up: Review Exposure Triangle.
  2. Sketch out two ideas for slow shutter speed using the colored pencils and sketchpads.
  3. Make two photos out of those sketches.

Today’s Warm Up: Exposure Triangle

Use the M Mode:

  • To adjust Shutter speed: Wheel on top of camera.
  • To adjust ISO (Light Sensitivity): Press ISO button on top of camera.
  • To adjust Aperture: wheel that says ‘Set’ in the Middle

Look at the drawing up at the top of the screen and the notes on how to change Shutter Speed, Aperture and ISO.

Answer the following questions on your visual Journal.

What Mode do you need to be in when shooting to adjust Aperture, Shutter Speed, & ISO.

What sort of shutter speed do you need to be at in order to create a slow shutter speed image?

What sort of ISO do you want to shoot at for light painting?

What sort of Aperture do we need for slow shutter speed, so that there isn’t too much light coming into the camera?

Design a site like this with WordPress.com
Get started