This Week’s Photo Challenge: Complementary Colors

http://color.adobe.com

Using Adobe Color, I can see which colors are complimentary (reside on opposite ends of the color wheel)

For this week’s photo challenge, we will be making TWO photographs that explore both ends of the color wheel. If we use Adobe Color, we can easily see which colors are complementary. By going into Adobe Lightroom, and going to the color panel, you can control the individual levels of each color to make it more complimentary.
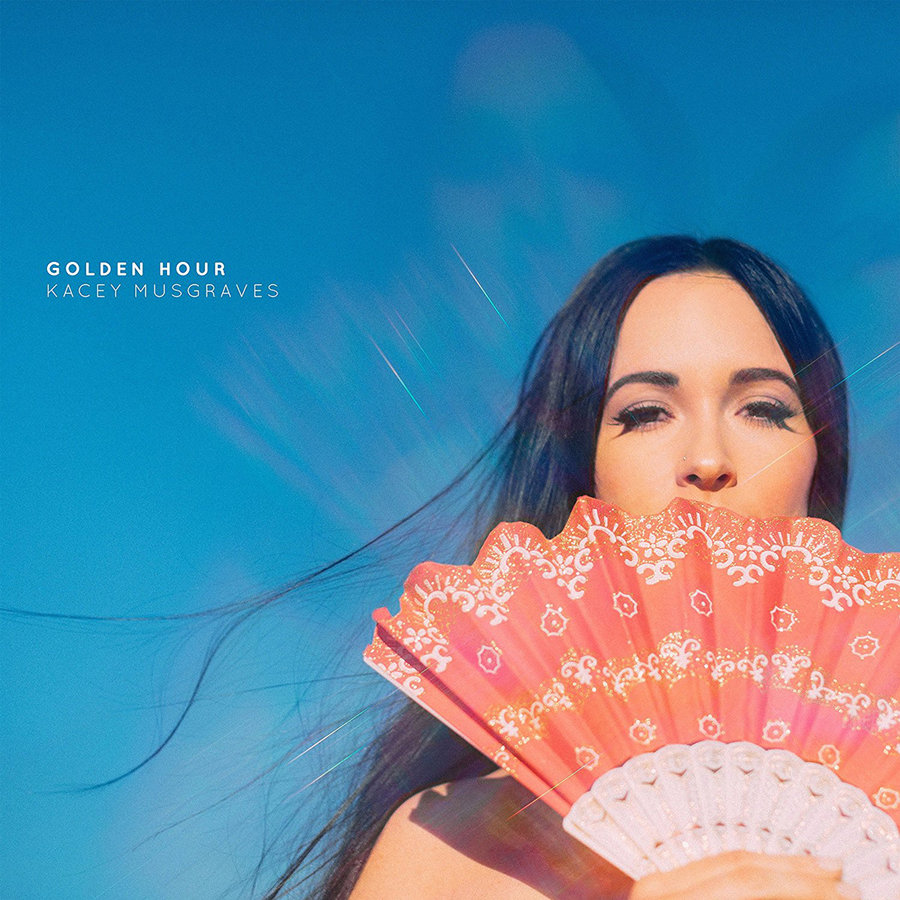
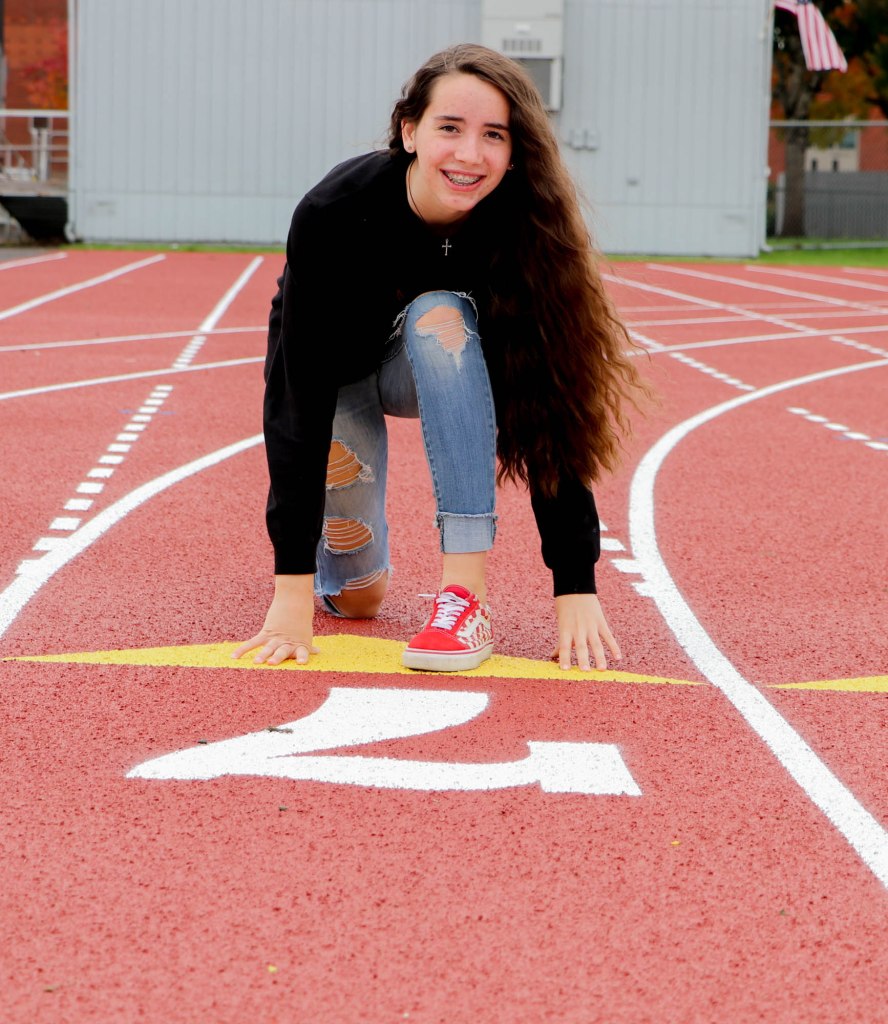
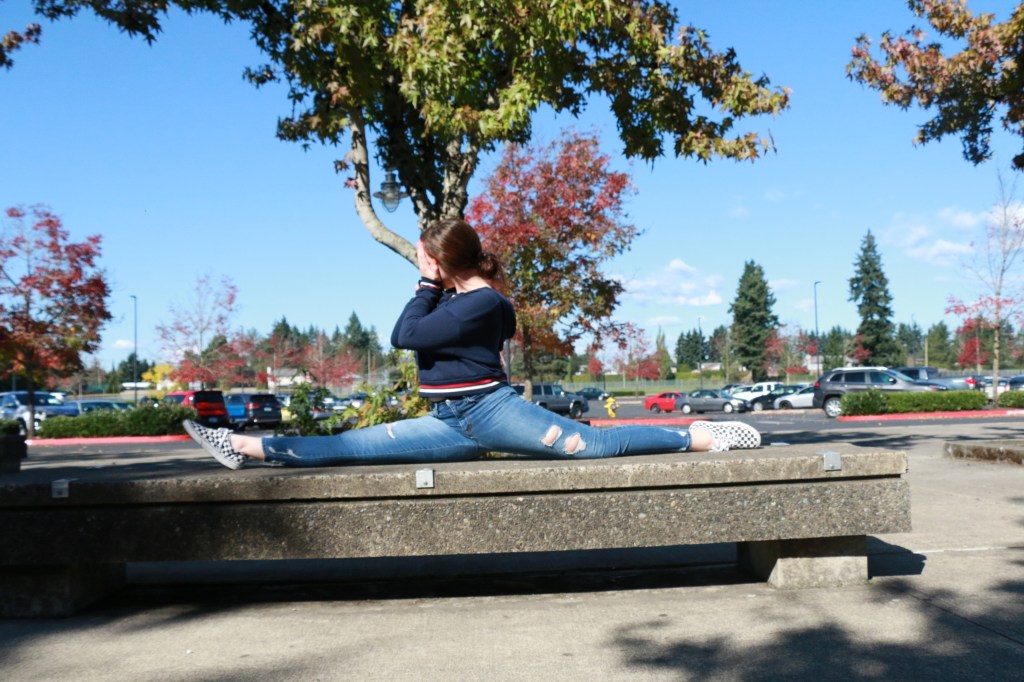
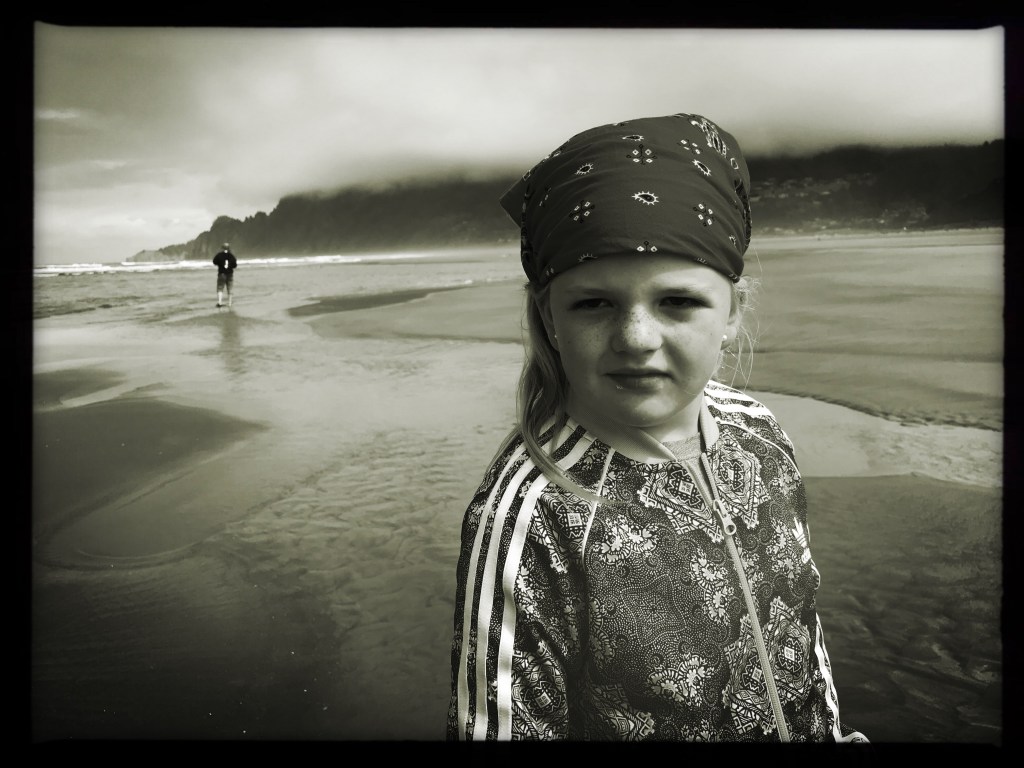
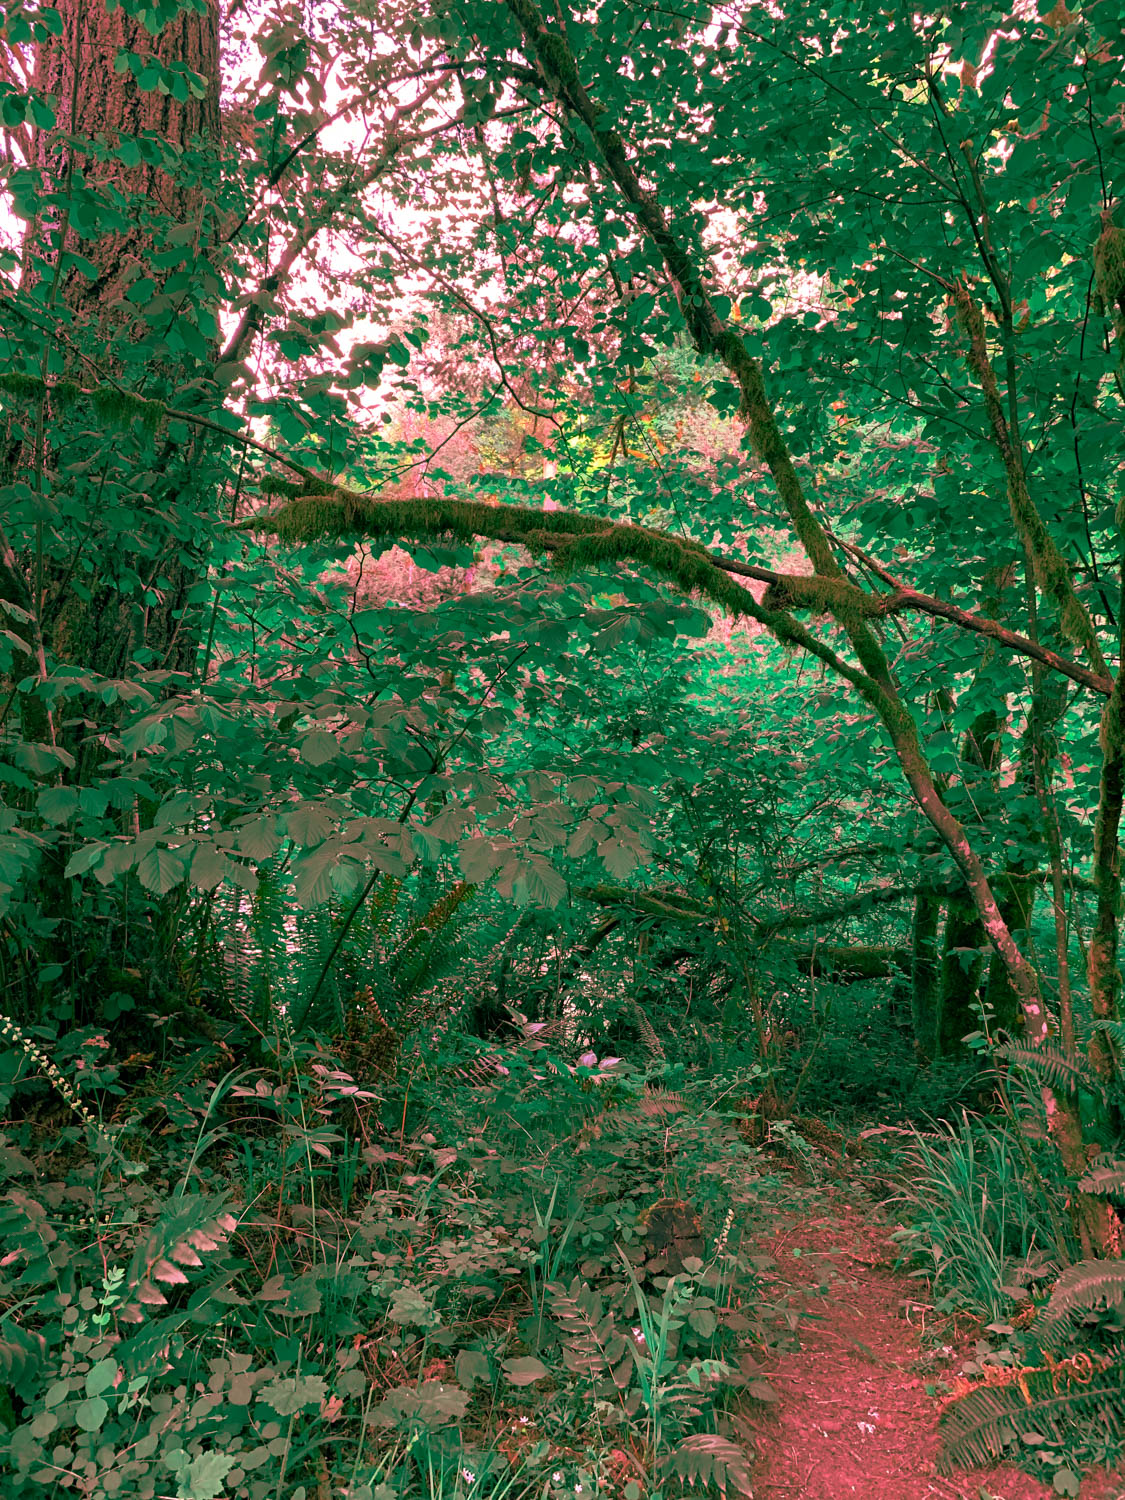
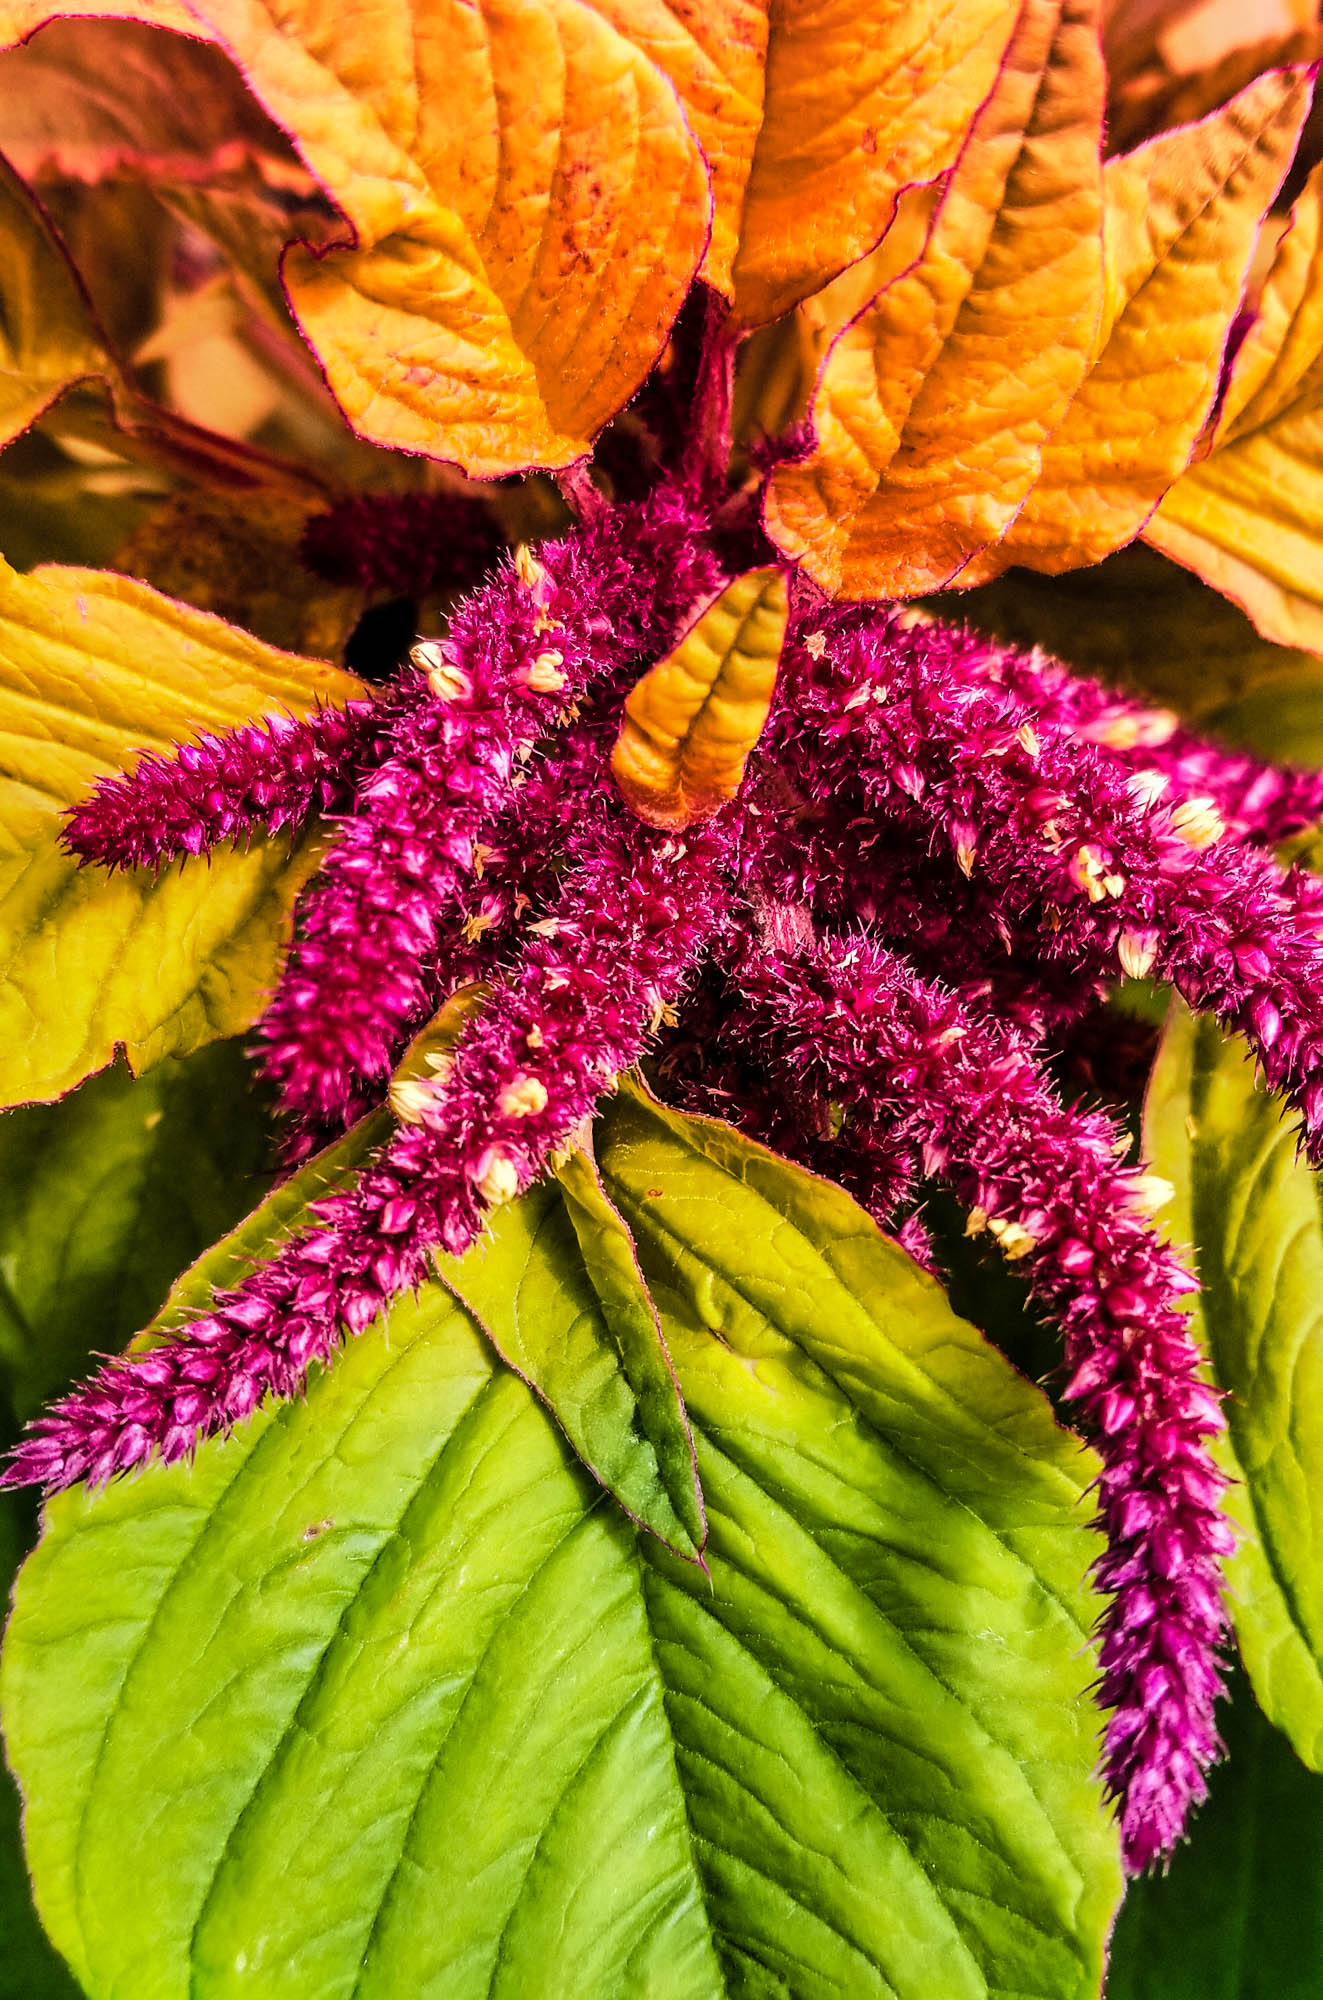
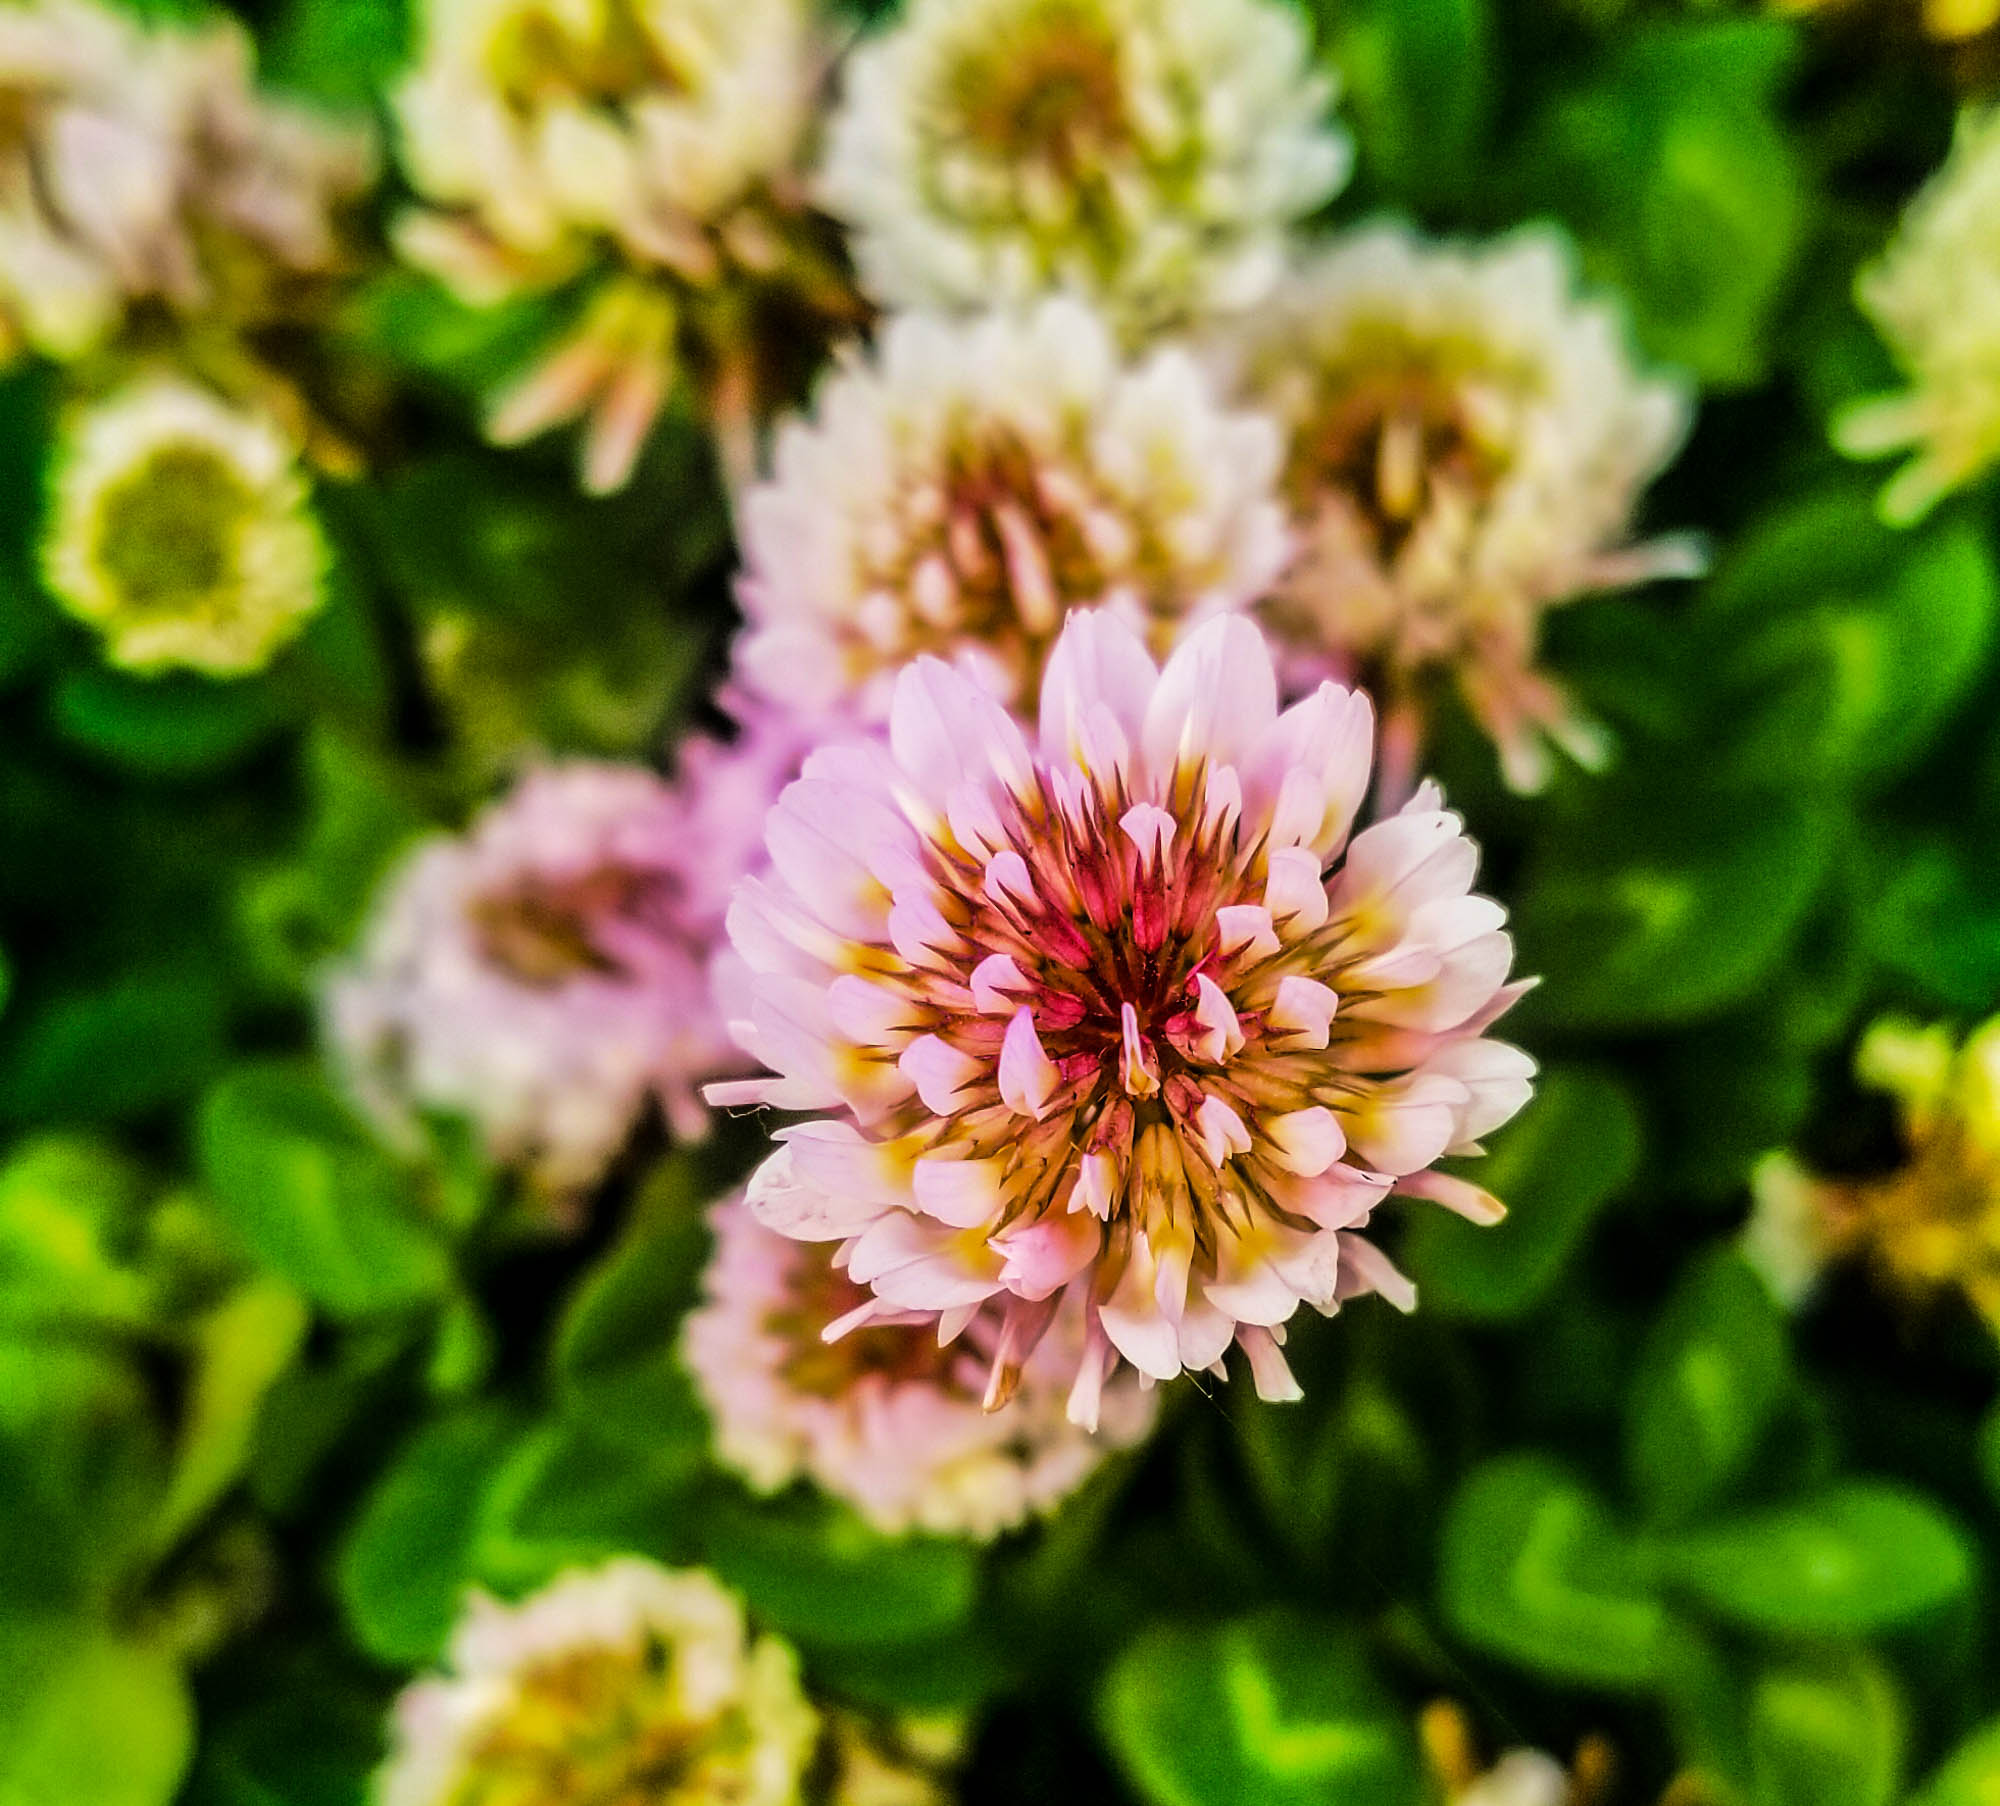
Red & Green are at Opposite Ends of the Color Wheel. I adjusted the colors in Adobe Lightroom to assure that they were on opposite ends of the color wheel . Photo by Adam Strong
Same thing with brown and cyan. The above shot was taken with an infrared filter early one late spring morning here at HHS.
Another option is to use a gradient map. A layer that has a blend of two complementary colors. I made two and can choose between either the sand or cyan, or the red and green. Note I have the blend mode set to overlay.

Student Examples:

How Color can Affect Emotion

Image Courtesy: Nofilmschool.com

Two images that demonstrate Complementary Colors are due before 3.13

Resources:

24 Powerful Images with Complementary Colors

The Psychology of Color

https://color.adobe.com/create/color-wheel/

Awesome website that talks about Film Color Theory in Video and Film Production.

https://nofilmschool.com/Film-color-theory-and-color-schemes

What I’ll be grading you on.

  • How well you demonstrate complimentary colors.
  • How well you incorporate concepts of Color Psychology into your images.
  • The ideas your image present. How well the complementary colors are enhanced in Lightroom or Photoshop.
  • How well you capture two specific emotions using the color wheel.

Pre Production – Research

Research different ways photographers have used complementary colors in their photography. Find inspiration photos and include them on your visual journal. Choose a background, like a wall,field of grass, then choose a subject that has a color complementary to that background. You can test the colors using the Adobe Color color wheel.

Production – Shooting & Editing

Shoot your two sketches. Shoot from different angles, ask yourself where you want the complementary colors to go. Will they be in the original images, or will you add the colors later?

Post Production – Reflection

Write a reflection based on your experiences making these photos. Include all reflections, sketches and inspiration photos in your visual journal.

Two images that demonstrate Complementary Colors are due before 3.13

This Week’s Photo Challenge: CD Album Cover with Text

Professional Examples:

Student Examples:

YOUR PHOTO CHALLENGE FOR THIS WEEK IS TO CREATE YOUR OWN CLASSIC ALBUM COVER! Create your own band name, your own font that reflects the name of your made up band. USE TEXT TOOLS IN PHOTOSHOP TO CREATE TEXT THAT MATCHES THE MOOD OF YOUR ALBUM COVER.

Even though some of the examples doesn’t have text, your cover must have text!

Images will need to be exactly 1600 pixels by 1600 pixels, forming a perfect square.

First CD Album Art Photo is due on 3/3

Second CD Album Art Photo is due on 3/6

You will be graded on:

  • Use of text and how it adds to the feel of the album cover:
  • Text placement, Font Choice, Shading,
  • Text on a path,
  • 3d Text Effects, Bevel and Emboss, Horizontal and Vertical Text. Text Selections, etc.
  • How well the photograph matches the name of the band and the text, forming one complete package.
  • Camera techniques: I’ll be looking to see that you incorporate techniques that add interest to your photos (POV, ROT, Shutter Speed. etc.)
  • Focus (no blur please!) and editing in Lightroom & Photoshop
  • Employability skills: Is it turned in on time.
  • What the image says about being alive.

First CD Album Art Photo is due on 3/3.

Second CD Album Art Photo is due on 3/6

Photo Challenge #2: Indoor/Outdoor

For this week’s photo challenge, you will take one INDOOR PORTRAIT and one OUTDOOR PORTRAIT. of the same person One taken inside in one of our studio spaces, and one taken outdoors, either outside of school or on school grounds.

The purpose of any portrait isn’t just taking a flattering image of someone, but trying to get across the the viewer the essence of that person. Notice all of these examples show people being truly themselves. We can tell what their interests are based on where they are placed. Lying down on a patch of grass and looking up at the sky, arms placed just so. We get the essence of a person there. Standing in the batting cages, the light hitting her harshly, but she takes that light head on, with no apologies, there is personality there as well.

WE WANT TO GET PASSED THE SELFIE LOOK AND TRULY GET TO KNOW ANOTHER PERSON.

Find out two bits of information about this person, and capture two sides of their personality in two different photos.

One example could bet, Softball, see above. Or shyness, see above with the hand over the mouth. Maybe the person feels withdrawn, maybe they are a cocky confident personality, maybe they are goofy, funny. Put this in the shot!

To do these photos, we will be using the AV mode of the camera. This time we will be using APERTURE to control DEPTH OF FIELD

Depth of field is the amount of focus in an image.

In Narrow Depth of Field, we only see the Wolf in focus. Whereas in Large Depth of field, we see everything.

Depth of field is controlled by Aperture. In the AV mode of the camera. The Aperture is the size of the opening in the lens that lets light into the camera.

Note that the smaller the aperture number, f/1.4, the larger the opening, the larger the opening the smaller the opening. It works backwards.

So if you want the background blurred out, use an aperture of f/1.4 For everything in focus, you want to use a higher aperture, f/11, or f/22. Note that aperture effects shutter speed, and with a aperture setting of f/22, the shutter speed will be several seconds, so you need a tripod when shooting in this mode.

USE A/V mode to control aperture. Most portraits focus on the person, but a middle setting would allow the background to be visible as well.

What I’m grading you on:

  • Clear, in focus images.
  • A background that informs us of your person’s personality.
  • Appropriate Depth of field to the subject.
  • Strong sense of who this person is.

One indoor portrait and one outdoor portrait are due on Wednesday, 2/26

New Photo Challenge: Indoor/Outdoor

For this week’s photo challenge, you will take one INDOOR PORTRAIT and one OUTDOOR PORTRAIT. of the same person One taken inside in one of our studio spaces, and one taken outdoors, either outside of school or on school grounds.

The purpose of any portrait isn’t just taking a flattering image of someone, but trying to get across the the viewer the essence of that person. Notice all of these examples show people being truly themselves. We can tell what their interests are based on where they are placed. Lying down on a patch of grass and looking up at the sky, arms placed just so. We get the essence of a person there. Standing in the batting cages, the light hitting her harshly, but she takes that light head on, with no apologies, there is personality there as well.

WE WANT TO GET PASSED THE SELFIE LOOK AND TRULY GET TO KNOW ANOTHER PERSON.

Find out two bits of information about this person, and capture two sides of their personality in two different photos.

One example could bet, Softball, see above. Or shyness, see above with the hand over the mouth. Maybe the person feels withdrawn, maybe they are a cocky confident personality, maybe they are goofy, funny. Put this in the shot!

To do these photos, we will be using the AV mode of the camera. This time we will be using APERTURE to control DEPTH OF FIELD

Depth of field is the amount of focus in an image.

In Narrow Depth of Field, we only see the Wolf in focus. Whereas in Large Depth of field, we see everything.

Depth of field is controlled by Aperture. In the AV mode of the camera. The Aperture is the size of the opening in the lens that lets light into the camera.

Note that the smaller the aperture number, f/1.4, the larger the opening, the larger the opening the smaller the opening. It works backwards.

So if you want the background blurred out, use an aperture of f/1.4 For everything in focus, you want to use a higher aperture, f/11, or f/22. Note that aperture effects shutter speed, and with a aperture setting of f/22, the shutter speed will be several seconds, so you need a tripod when shooting in this mode.

USE A/V mode to control aperture. Most portraits focus on the person, but a middle setting would allow the background to be visible as well.

What I’m grading you on:

  • Clear, in focus images.
  • A background that informs us of your person’s personality.
  • Appropriate Depth of field to the subject.
  • Strong sense of who this person is.

One indoor portrait and one outdoor portrait are due on Monday, 10/7

Next Photo Challenge: Fast Shutter with Symmetry

Note how the image shows a person frozen in motion and the image is symmetrical

For this week’s photo challenge, we will be using a fast shutter speed in order to freeze a fast moving object or person. We will then take the final image into photoshop and duplicate the image, laying one next to the other, see above for an example

To do this, we will need to shoot with a fast shutter speed. Looking at the histogram in Lightroom we see how the student used a fast shutter speed in order to capture this image.

Note the shutter speed here, 1/640th of a second

For this photo, the photographer used a shutter speed of 1/640. Using a slower shutter speed would have resulted in an image that has motion blur. Which is when a part of the subject is blurred out because the shutter speed was not fast enough to capture the person or object.

How you will do it.

  1. Take a practice photo, where you demonstrate freezing a fast moving object or person.
  2. Post it to your visual journal. Write a reflection about what you could do to improve this photograph? About which photo would look good placed side by side by the same photograph? What subject would look good with a duplicate facing the opposite direction?
  3. Take the photo.
  4. Edit it in Lightroom or Photoshop.
    1. Brightness Contrast
    2. Details/Sharpen
    3. Details/Noise Reduction
    4. Clarity
    5. Color or Black and White?
    6. Cropped?
    7. Straightened?
  5. Make a virtual copy in Lightroom. Rotate one image so it is facing the opposite direction.
  6. Open up both images in Lightroom.
  7. Crop the image and expand the work area.
  8. slide one photo next to the other.
  9. Export the photo from Lighroom using these settings

TWO Photos are due on 10/2

  1. One practice photo demonstrating you can freeze motion with fast shutter speed.
  2. One final photo that demonstrates slow shutter speed AND has a symmetrical mirror image like the one in the above example.

What I’m grading you on:

  • Image is in focus.
  • Image is well edited, see above for checklist.
  • Image has a symmetrical image next to it. See example.
  • Subject is a fast moving object or person frozen with a fast shutter speed.

Next Assignment: Slow Shutter with Storytelling

For your next photo challenge, you will use a slow shutter technique in order to tell a story.

What is shutter speed?

Shutter speed is the amount of time the shutter is open on the camera when you take a picture. The shutter is the clicking sound you hear when you take a picture.

It is measured in seconds and fractions of a second.

How do I change shutter speed on these cameras?

USE the TV mode of the Canon DSLRs. Spin the black dial and you will see the numbers change. See above for examples.

The setting says 2″ what does that mean?

The ” symbol refers to whole seconds. So 2″ = two full seconds of the shutter being open for.

A slow shutter speed blurs the action, a fast shutter speed freezes the action.

The entire image is blurry, what am I doing wrong?

YOU MUST USE A TRIPOD FOR THIS ASSIGNMENT.

Step 1: Using a slow shutter speed on the camera, create a slow shutter speed effect, like a ghosted image, see the chess piece and the girl’s face, or the arms, or is it light painting. SEE BELOW

The above photo was taken in a dark room, the studio, using a flash light or a phone, and waving it around until the desired effect is present. Note that the image succeeds not JUST on the light painting assignment, but for how well the effect interacts with the subjects. The image wouldn’t be as strong if it were just the cross.

Step 2: Pull up the slow shutter image in Lightroom. Ask yourself, how could I add more story to the image.

Step 3: Now take the image with BOTH the slow shutter speed effect, and add a story element to the photograph.

SLOW ZOOM

I MADE THIS PHOTO BY DOING A SLOW ZOOM WITH A MULTIPLE SECOND SHUTTER SPEED.

You will turn in two images for this assignment, one is where you first create the slow shutter speed effect, and the second is where you add the storytelling element to the slow shutter speed effect.

What I am Grading You On:

  • In focus images.
  • Effective Composition.
  • Basic editing.
  • Presence of storytelling element.
  • How engaging your story is.

TWO Images are due turned into Google Classroom by 9/24

One image is your practice image.

The second is your final slow shutter image with a story element.

Lightroom Export Settings:

Photo Challenge 1: Decisive Moment

Both of these images were shot this summer on my cellphone, using an app called Hipstamatic. Both were shots I didn’t plan out. I knew that they would make good subjects for pictures. And I definitely had to wait for the right moment, but it wasn’t that easy. I took several shots of each subject. I chose the one that had the strongest emotional impact on me. For both images I used the rule of thirds composition technique and both images have relationships between the foreground and the background.

The small moments captured in the photos above represent just one snapshot of time frozen with a picture. That’s what a picture can do, perfectly capture a moment. There is theater alround us at all time. It only takes an observant person to notice these moments.

If you don’t have access to younger siblings or cousins, or what not. Try the clouds, try a pet. Try the way the light hits the side of a house, or an open window on a summer afternoon. There are decisive moments both small and large happening all the time. All it takes is an observant person to capture them.

Step 1:

Shoot around 10 photos of various subjects.

Step 2:

Bring in the photos to class.

Step 3: Load the images into Lightroom.

Step 4: Edit the photos to enhance the decisive moment factor of your photos.

Step 5: Rate the photos from one to five stars.

Step 6: Upload the top three images to your visual journal.

Turn in these three into Google Classroom as .jpegs.

Photos are due on Tuesday, 9/10

Design a site like this with WordPress.com
Get started